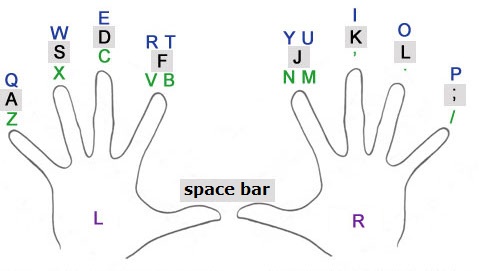
Hand position on a keyboard
Home row position
The small bumps on F and J mark where your index fingers should rest. Left hand: index on F, middle on D, ring on S, pinky on A. Right hand: index on J, middle on K, ring on L, pinky on ;. After every keystroke, return to this position - it is the foundation of touch typing.
Curved fingers
Your fingers should be slightly curled, as if you were holding a tennis ball. Flat, straight fingers lose precision and tire much faster. The hand should keep a natural arch - knuckles raised a little higher than the fingertips.
Touch, not pressure
On the home row your fingers simply rest - they don't press. Press a key only when you want to type a letter, and with the lightest force that works. Hammering the keys exhausts your fingers within minutes and doesn't make you type any faster.
Thumbs on space
Press space with whichever thumb is closer to the last key you struck - if you just typed a letter with your left hand, use your right thumb, and vice versa. The other thumb should hover over space, ready to go. With practice this happens automatically, without conscious thought.
Return to home row
After each keystroke, bring the finger back to its home position. The return is what you're actually training - not the strike itself. Without it, your fingers drift across the keyboard, the next letter forces you to look down, and the rhythm of touch typing falls apart.
Both hands carry equal load
In touch typing both hands should work evenly. If one hand is overworked during an exercise while the other rests, you're probably reaching for keys with the wrong finger - using a finger that doesn't own that key. Check the finger-to-key table below and see which side a given character belongs to.
Relaxed wrists and shoulders
Keep your wrists straight - don't bend them up or down. If you notice your shoulders tensing up or your hands clenching, pause for a moment, take a breath and let your shoulders drop. Tension builds up faster than you'd expect and eventually causes pain in the wrists and neck.
Finger-to-key assignment
Left hand (pinky to thumb)
- pinky: 1, 2, Q, A, Z, Shift
- ring: 3, W, S, X
- middle: 4, E, D, C
- index: 5, 6, R, T, F, G, V, B
- thumb: Alt, Space
Right hand (thumb to pinky)
- thumb: Space, Alt
- index: 7, 8, Y, H, N, U, J, M
- middle: 9, I, K, ,
- ring: 0, O, L, .
- pinky: -, [, ], \, ', =, ;, P, Enter, Shift, /